Pages

Saturday, October 26, 2013

Kale and Lentil Soup with Gluten Free Popovers


This soup was so easy and hit the spot on a chilly fall night!  The kids love to play outside with the neighbors when they get done with their homework.  They are usually out there until we drag them in for dinner.  That's good because pretty soon the snow will be here and we will be held captive in our home for months.  I exaggerate, but you cold weather people know exactly what I'm talking about.  The point is, when it's cold outside nothing beats coming in to something warm cooking on the stove. 

I found this searching for healthy soups online at Girl Makes Food.  You can click the link for her recipe.  The only changes I made were substituting dried oregano for parsley (because I was talking on the phone and grabbed oregano instead of dried parsley), 3 cups frozen chopped kale instead of fresh (because I always have it in the freezer), regular lentils instead of red (because I had them in the pantry), and no red pepper flakes since the kids and I are wimpy.  The boys loved the soup.  It's great because it can be made in about a half hour if you have the ingredients on hand.

Ingredients
8 cups Vegetable Broth-I used organic from Costco
1 1/2 cup Red Lentils (rinsed)- I used Meijer's Natural lentils (not red)
2 Carrots
2 Onions
1 bunch of Kale-I used Organic Chopped Frozen Kale
1 clove Garlic
1/4 tsp Red Pepper Flakes (optional)-skipped this
1 T Parsley-added dried oregano (oops!)
Zest of 1/2 Lemon

You put the veggies and lentils into the pot with the broth.  Bring to a boil, then simmer for 15-20 minutes.  I did 20.  Add the seasoning and lemon zest when you turn off the burner.  It's just that easy!

The only changes I will make next time is to add more carrots.  It didn't seem like enough, my boys agreed.  I'm sure fresh parsley would be perfect.  I just hope I remember next time!  And don't take a phone call.  

This soup is gluten free and vegan!

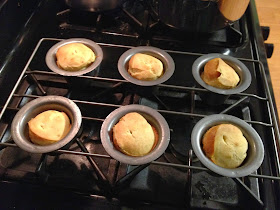
I served this with gluten free popovers from my Gluten Free on a Shoestring cookbook.  Click the link for the recipe.  Mmmmm....  The popovers are GF, but not Vegan since it has eggs.  I'm thinking you could use an egg substitute.  It's a very simple recipe, so try it.  Let me know if you do make it vegan and I'll update my page.


Zucchini Lasagna


I found this recipe on Skinnytaste.com.  I'm always looking for something new and gluten free.  It's delicious!  Well, let me try again.  It was delicious the next day.  I'm not sure if we were starving and couldn't wait for it to "set up" before slicing in, but it was runny and "okay" the night I made it.  I was about to put it in the "probably never make again" pile, when I reheated the leftovers for the kids and I for lunch the next day.  To myself I thought, this tastes great.  Then I started to hear the kids "mmmmmm" and knew they felt the same.  I would DEFINITELY make it again, just let it set over night.  The flavors developed, it wasn't runny and held up fine when you sliced into it.  Just plain YUM!

Click on the above link to get the full recipe.  I pretty much stuck to the recipe this time.  I know, shocker.  I toyed with the idea of not even blogging this recipe, but decided you needed to know about it.  Give it a try!

Tuesday, October 15, 2013

Kale and White Bean Soup


This soup is absolutely delicious.  My whole family loved it (hubby, 9 year old and 12 year old).  If you are looking for a new soup to try for the cool weather that is coming this fall, this is the one!  I follow a lot of blogs.  One that has really good healthy recipes is the Nourished Kitchen.  That is where I got the recipe for this soup:  The Nourished Kitchen.

I did make a few modifications, but nothing major.  I'll put my adaptations in red.  Don't ever feel you can't make something because you don't have all of the ingredients or don't like something.  Just adapt it to your liking.


Kale and White Bean Soup
  • 2 cups white beans (such as cannellini beans) (I used canned, organic and rinsed them well)
  • 1/4 teaspoon baking soda (did not need since I used canned beans)
  • 1 tablespoon butter or ghee (did not need since I used canned beans)
  • 4 ounces bacon (chopped) (I use Hormel 100% Natural with no nitrates or preservatives)
  • 1 medium yellow onion (finely chopped) (I only had red onion)
  • 2 medium carrots (peeled and finely chopped)
  • 3 ribs celery (finely chopped)  (I used 2)
  • 8 cups chicken stock
  • 2 bay leaves
  • 1 branch rosemary
  • rind of a hunk of parmesan cheese (optional) (I used this)
  • 1/2 teaspoon piment d'Esplette (or paprika) (I used smoked paprika from Trader Joe's)
  • 1 bunch kale (trimmed of tough stems and sliced thin) (I used 2 cups organic chopped kale)
  • extra virgin olive oil (to serve) (didn't add this, added fresh grated parmesan on top)

Instructions  I skipped 1-2 since I used canned

  1. Toss the beans in a large mixing bowl, cover with hot water by 2 inches and stir in baking soda. Soak for 18 to 24 hours, changing the water once or twice. Drain and rinse well.
  2. Transfer the soaked beans into a large stock pot, cover with water and bring to a boil over medium-high heat. Reduce heat to medium-low and simmer, covered, until beans are tender - about 1 1/2 hours. Drain.
  3. Melt butter in a large stock pot until it froths. Stir in bacon and cook until crispy. Stir in onion, carrots, celery and garlic. I added 3 cloves of garlic since it didn't really say how much to add.  Stir frequently, and fry until fragrant - about 10 minutes.
  4. Pour in chicken stock, add rosemary, bay and the rind of a piece of parmesan cheese. Simmer over medium heat, covered, for 20 to 30 minutes.
  5. Remove from heat, stir in piment d'Esplette I used smoked paprika, beans and kale. Cover and allow the kale to wilt in the residual heat of the soup for about 5 minutes. Salt as needed and serve with extra virgin olive oil.
LOVED this recipe.  Enjoy it!!!

Monday, September 30, 2013

Plantain Lasagna


We LOVE plantains at our house.  On the weekends the kids repeatedly ask for mangu, which I first had at my mother-in-law's and tweaked it a little.  It's a Dominican dish that uses green plantains.  Where I live there are not a lot of Dominicans, but rather Mexican and Puertoricans who use ripe plantains (yellow).  So to get a green plantain is sometimes tricky.  I have to get them close to the delivery date to the store, or wait until the next delivery.  There is a small farmers market open daily that has them, but again, most of the time they are yellow.  

For this dish the recipe called for ripe plantains, which if you have had one you know they are sweet.  I wasn't really feeling a sweet lasagna.  For me yellow plantains are good sliced and sauteed in a little oil to bring out their sweetness.  With that in mind I went for a green/yellow plantain.  One that was loosing the green, but not quite ripe.  It would be plenty sweet for us, especially for what I consider a savory dish.
 
I used a mandolin to slice them so they would all be equal in thickness.  Then I sauteed them in a little oil on both sides to brown them.  Put a layer in the bottom of a 13x9 pan.  The recipe called for 9x9 which I didn't have so I used this.  I will definitely buy more plantains and double the meat mixture so that I can put on an additional layer next time.


The meat mixture is simple.  Just brown the meat and add the veggies and seasonings in the order the recipe states.  You can find the original recipe here:  Skinnytaste.com.  I love this site.  There are always lighter versions of some of our favorite meals, and new recipes to try that are always winners with my family.


Once you layer your plantains, you add a layer of meat.  As you can see I was light on the meat since I had a bigger dish and wanted to get at least 2 layers in.  


Sprinkle with your choice of cheese.  I used a Mexican cheese blend, but would have liked to grate my own.  I just had this on hand.  Continue layering and bake for 30 minutes.


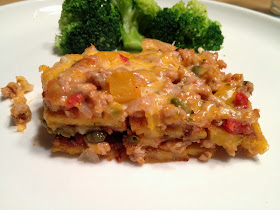
Here is what it looks like when it comes out!  YUM!

I skipped the part about the milk and egg whites at the bottom of the recipe (I actually forgot), and it turned out fine.  I also used red onion because it didn't specify what kind, and I mostly use red onion when cooking Hispanic dishes.  I'm not a fan of green pepper, so I used yellow.  I didn't have a tomato (AKA to lazy to go out to the garden), so I opened a small can of diced tomatoes and used about half.  Since it was open I used an immersion blender to blend the rest of the tomatoes and added the 1/4 cup of water for the tomato sauce in the recipe.  And I used capers because I had them in the pantry.  

You use what you have on hand and make it work.  I did and the family LOVED it.  Except for my youngest who does not like sweet plantains.  I may do this with green next time so it's all savory and not a hint of sweet.  

Go for it.  Give it a try.  It's delicious and gluten free!

Sunday, September 22, 2013

Fish Wrapped in Parchment


I'm always looking for new ways to cook fish.  I love to saute it, bake it, broil it and grill it.  This is a very easy way to put together a delicious meal in minutes.  You can really do it with any kind of fish.  I used tilapia, catfish, salmon.  Pick your fish and get busy.

Season your  fish with salt and pepper, then your favorite fish seasoning.  I use dill for salmon, garlic and basil for catfish, and rosemary seasoning for this tilapia.  Cut out large parchment hearts, put your fish inside along with a drizzle of olive oil and thinly sliced lemon. 


Wrap the parchment starting at the top of the heart.  Add a tablespoon of wine or water to the packet and then seal it by folding the end under.  Bake at 350 for 15-20 minutes.


Enjoy!  Serve with your favorite sides.

Thursday, July 18, 2013

Homemade Larabars


I made four types of homemade Larabars today.   Our family LOVES them, but its so expensive to support their Larabar habit.  No really!   It is!  Those are not cheap, but to make them at home is affordable and more delicious.

I basically did a search on the internet to find recipes and picked the ones that I thought our family would enjoy the most.  I did make the Homemade Peanut Butter Chocolate Chip Larabars again.  Still my personal favorite.

I also made the following:
-Caramel Pecan Energy Larabars and Coconut Cream Energy Larabars from Running on Real Food.
(The Caramel bars are not pictured because I am  giving them an overnight in the fridge.  They seemed a little fragile so before I sliced them I wanted to be sure they are going to hold up.)

-Better than Larabars from Bonzai Aphrodite
 
-Hot Fudge Brownie Larabars from  Chocolate CoKatie  (these were my son Nicholas' request)

You can click on any of the above links for the recipes.  You basically put all of the ingredients into the food processor, and mix until it all comes together.  I like to fold parchment paper and leave an overhang on both sides. Then I dump the mixed ingredients into the pan and can fold the excess over the top and use another loaf pan to press them down.  This keeps it clean and makes it easy to lift out when it's firm. 


Since I made so many today, I pressed them and then removed them from the loaf pan and put each one on a large sheet pan with press and seal to keep them fresh.  Then I put them into the fridge.  The bars from the Bonzai Aphrodite made double so I put that in an 8x8 pan and pressed it down.

If you chill them overnight it's best, but I can rarely wait so I keep them in the fridge as long as I can.  When you are ready to cut them, you can flip the parchment under one side (keeps your cutting board clean).  I like to use a cutting board with measurements so that I can cut my bars evenly.


Once I have them cut I bagged them.  Last time I used parchment to wrap them.  First it uses a lot of parchment paper, and second they are fragile so the less you flip them around the better.  I used snack bag sized baggies and it worked great.  I put them in a couple of lock containers and labeled the outside so the kids can see what kinds are in each container.  I store them in the fridge.


Give it a try.  Easy and delicious!  I've got lots more I want to try too! 

Zoku Ice Pops


Do you have a Zoku ice pop maker?  You can make at least 9 ice pops with just one freeze.  Each 3 pack only needs about 10-12 minutes to get completely frozen.  Then you just pop them out with the little orange tool.  I did learn the hard way that you need to use liquid.  I tried to do a thick smoothie consistency and that was a disaster.  It got stuck and then we had to wait for it to thaw which took forever.  Then another overnight freeze.  BUT today we were successful. 

So when we finally got our ice pops...


...they were all smiles and had to try both types!


There are all kinds of recipes on the website and there is also a book you can buy.  We have the book and the boys are eager to try some of the fancier kinds like s'mores and pumpkin pie.  I can't wait to try the mojito pops.

Wednesday, July 3, 2013

Homemade Peanut Butter Chocolate Chip Larabars


When our family went gluten free, one of the hardest things to find was a bar that the kids could eat that tasted good.  We stumbled upon Larabars and they were hooked.  The problem is, they are not cheap!  They can run $1.00-$1.50 per bar.  If you have boys in the house, you know that you have to have a "go to snack" for the times you don't have time to prepare something.  We always have apples, bananas, carrot sticks, yogurt, string cheese...but sometimes they want something more substantial... and sweet.  Me too, who am I kidding.  

You may not be gluten free.  You may think your granola bar or protein bar is healthy.  Take a look at the ingredient list.  Do you recognize every ingredient on there?  Is there a LOT of sugar?  I personally am extremely aware of ingredient  lists...I don't buy a lot of packaged food, so when I do I want to know what's in it.  If it's going into my kids or my body, it needs to have substance and be nutritious.  

Okay, off my soap box.  These are EXTREMELY EASY TO MAKE!  I promise you.  There are only 4 ingredients!  Yes,  you read that correctly.  :)  And yes, you can totally make these!  Get out your food processor and these ingredients, and go for it!


I got the recipe from The Wanna Be Chef.  Just click the link to see her version.  I made mine without the salt.  Here is what I did:

HOMEMADE PEANUT BUTTER CHOCOLATE CHIP LARABARS
makes about 6 bars

Ingredients

1 cup pitted dates (I used Sun Dates)
1/2 cup peanuts (I used Planters dry roasted peanuts)
2 T creamy peanut butter (I used Natural Jif Creamy)
1/3 cup miniature chocolate chips (I used Ghiardelli)

Directions
  1. Place dates and peanuts into a food processor and process until it starts to form a paste.
  2. Add peanut butter and process until a "dough" starts to form.
  3. Add miniature chips and pulse (just enough to combine). 
  4. Line a loaf pan with parchment paper, with overhang on each side.  Add ingredients and spread out into loaf pan.  Fold parchment side over mixture and place another loaf pan on top to press into bars.  
  5. Refrigerate until bars hold together (1-2 hours per other recipes).  I put mine into the freezer for 30 minutes and they held together.  
  6. Remove from pan with overhang from the parchment and slice into bars.  
  7. Wrap in parchment or plastic wrap and store in the refrigerator.  


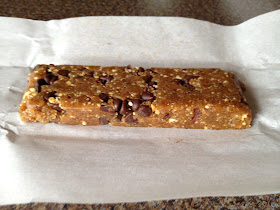
 I stored mine like this with a lid and put them in the fridge.  You can store them in an airtight container in the pantry too, but if you've had a Larabar you know they can get sticky if too warm.  Give it a try.  You won't be disappointed.  And you save a TON of money doing it yourself!

Tuesday, May 28, 2013

Spareribs with Homemade Barbecue Sauce


Okay, so not the best picture, right?  Well this is the second time I made spare ribs and they disappear so fast that I had to take a picture when they came right out of the oven.  No fancy plate shot, not cute serving tray...nothing.  You are going to love the flavor these take on when you make your own rub and barbecue sauce.  Don't make that face.  You can do it.  Once it's done you  have two jars of sauce to keep in the fridge, and enough rub for the next time you make them.  You can use it for other meats too!  But these ribs were to good not to make twice!

I volunteer on Friday's at my son's school library.  They have a great librarian and whenever she holds a book fair, she lets the volunteers pick a free book.  She usually tells me to pick one for myself, knowing parents are always getting their kids more books.  She said she ordered one that I might really like.  I picked it up and thought, do I really need another cookbook?  Then I thought, of course I do...who doesn't?  It sat on the cookbook pile of cookbooks I need to go through and pick meals from of for a LONG time.  By long time I mean about a year!  I finally got to it and so far YUM!  I'm excited to share this recipe with you.  I would encourage you to get the book though, because Katie Workman has outdone herself in this easy to follow, family cookbook.  You can order it at amazon here:  The Mom 100 Cookbook by Katie Workman.  Thank you, Fiona!  For a great cookbook.

So here's what you do:

Spareribs with Homemade Barbecue Sauce

Spice Rub
2 T kosher salt
2 T light or dark brown sugar
2 T sweet paprika
1 1/2 tsp black pepper
1 1/2 tsp dried oregano
1/2 tsp adobo seasoning (optional)   I didn't use this
1/4 tsp red pepper flakes    I didn't use this
1 rack pork spareribs (6-7 pounds)

Directions for the Ribs
  1. To make the spice rub:  mix all of the ingredients in a small bowl and set aside.  
  2. Rinse the spareribs and pat them dry.  Rub them with 1/4 cup of the spice blend and place them meaty side up on a baking sheet.  (Use a wire rack on the sheet if you have one.  I didn't so I just put them on the sheet.)  You may have to cut them to fit onto the sheet.  Let them sit in the fridge a few hours, or bake right away at 250 degrees for 2 1/2 .  (I baked right away.)
  3. You can finish these on the grill or bake them in the oven.  I continued in the oven.  Turn the oven up to 400 degrees, and baste the ribs with sauce.  Bake another 30 minutes until nicely browned.  Add as much or little sauce as you like.  My boys like less sauce, so I usually leave them as is for them, and baste the adult portions again.  Plus more sauce on the table if needed.  
Barbecue Sauce
2 T vegetable or canola oil
1 1/2 C chopped onion
2 T finely chopped garlic
4 C ketchup (I used Simply Heinz, but Trader Joe's has a good one too)
1/2 C cidar vinegar
1/4 C light or dark brown sugar
1/4 C honey
1/4 C tomato paste
3 T worcestershire sauce
2 T Dijon mustard
1 T chili powder
salt and pepper

Heat the oil in a large saucepan over medium heat.  Add onion and garlic.  Cook until softened (about 3 minutes).  Add the other ingredients and season with salt and pepper.  Simmer on low heat for about 15 minutes.

Monday, March 18, 2013

Gluten Free Irish Soda Bread


One thing about going gluten free...I miss this kind of thing.  Whatever the holiday, I make a dinner with the foods from that country, we put on the Pandora to that style of music, and chat about the theme over dinner.  How can I possibly do St. Patrick's Day Dinner without Irish Soda Bread, a pint of Guinness, or Guinness Chocolate Cake?  Last year I perfected my Irish Soda Bread recipe and now I couldn't even make it?  

Then I began to think...and those of you who know me know where that can lead, but it actually lead me to the Perfect Flour Blend from Namaste Foods. I bought it on a whim in case I ever needed to add a little flour to something as a thickener.  Well, turns out I could make my Irish Soda Bread recipe and just substitute this flour...cup for cup!  

I did make one error, I'm not going to lie.  I left it to tall.  In other words, I should have patted it down a little.  In hopes for a high rise-looking bread I left it more ball shaped instead of flattening it out.  It was still delicious, don't get me wrong, but when I cut into the middle it wasn't cooked through, so I put some foil on it and put it back in the oven.  Came out better, but boys are impatient for that bread!  So I sliced it like biscotti and cooked the last few pieces that way.  UM, YUM!  They should make Irish Soda Biscotti.  No joke!  Sometimes mistakes can be a good thing.
Here's what I served it with for our Irish feast:

 
Shepherds pie, mixed greens with blackberries and balsamic vinaigrette, and delicious GLUTEN FREE Irish soda bread.  This is actually my son Marcus' plate.  He insisted I take a shot of his.  From this angle it looks like he has a piece of bread bigger than his plate!  It's not.  But boy does he wish it was!  Enjoy!


Wednesday, February 6, 2013

Eggs with Avocado, Tomato and Canadian Bacon


I'm trying out some new breakfast ideas. For those of you who know me, you know I am perfectly happy with oatmeal and whatever kind of fruit I have on hand.  BUT, I am doing a new workout routine and it comes with a recipe book.  I wasn't sure about this one, but it is DELICIOUS!  And really, it couldn't be easier.  

If you aren't a fan of fried eggs, you can poach or scramble them.  Do what you like.  I had never eaten avocado for breakfast.  The tomato/avocado/bacon/egg combination just works perfectly.  I was completely satisfied and pleasantly surprised.

269 calories

Give it a try!  You will love it.

Tuesday, February 5, 2013

Gluten-free Sandwich Bread


Well, I have been venturing into gluten-free bread land.  The first attempt was an epic fail and it was only 1 1/2 inches high.  Ya, not something my kids want to take to lunch.  Although if you slather enough apple butter on anything it tastes good, so we ate some with apple butter. 

When I purchased my first loaf at the store, it looked like pound cake to me.  And when I made a sandwich for my son, it looked pretty small.  The main purpose for me to make this bread is to allow the kids to have a sandwich in their lunchbox.  Who knew going gluten-free would be such a pain find a GOOD bread recipe?  And by good I mean tasty!


Any-who...I have spent way to much time on way to many blogs looking for the perfect bread recipe.  This recipe rose all the way to the top of the pan, so I call that a success in itself.  Sure beats my flat loaf that I made previously.  I really should have taken a picture of that!  It was quite  sad.


I left it resting upside down on the cutting board to cool.  I think it's easier to cut straight slices without bread crumbling when you cut from the bottom.  I could be totally wrong, but I swear it works for me.

I let the boys taste test it when it cooled.  My oldest son asked for some peanut butter on his.  He started raving about it, and said that it's way better than the store bought kind.  My youngest son had his with some peach jam.  He raised his eyebrows, gave a loud "mmmm," and said "this one's awesome!"  So, I guess we have a winner.

Where did I find this delicious gluten-free bread recipe?  I was searching various gluten-free blogs and this one stood out to me because of the title of the bread.  I saw "Tender High Rising Gluten Free Sandwich Bread" and knew I found EXACTLY what I was looking for.  It's an adapted King Arthur Flour recipe.  Find this recipe and more at Barefoot In The Kitchen blog.  You will not be disappointed.  I think I just found myself another great blog to follow!  :)


Grilled Salmon Citrus Salad


I'm always looking for new ways to serve salmon.  It's one of my absolute favorites!  This looks extremely easy...and it is.  I found this recipe in one of the guides that Jillian Michaels gives with her workout videos.  I don't usually follow the diets along with a workout, but all of her recipes were things I already eat, and put a little spin on what I usually do with it.  Plus, I don't think you can go wrong with salmon...ever.  

Ingredients:

2 T olive oil
2T lemon juice
4 6-oz salmon steaks
8 c mixed greens
2 tomatoes quartered
1 yellow/orange pepper (I used red because that's what I had)
1 medium cucumber, peeled and thinly sliced (I used a hothouse cucumber)

Here is what you do:

Cook salmon however you like it.  I grilled mine in a grill pan on the stove (about 3 minutes on each side).  Meanwhile arrange salad greens, tomatoes, bell peppers and cucumber on the 4 large salad plates.  Whisk together the olive oil and the lemon juice (you could also use lime juice).  Toss salad with the dressing.  Top each salad with a salmon filet.  YUM!

Serves 4
Calories:  368 per serving

Hope you enjoy!