Pages

Friday, April 30, 2010

Baked Macaroni and Cheese


We've all been there.  You forgot to take something out of the freezer for dinner.  Now what?  Well, last night it was macaroni and cheese.  I went ahead and took everything out for dinner for the next few days so it can defrost and made pasta.  What kid can resist pasta? 

I could not remember where I got the last recipe I made...and it was delicious...so this was a hodgepodge of recipes and thrown into the oven.  The kids loved it, hubby loved it and I was fine with that!  Here is what I did:

Boil the pasta according to the directions on the box.  (I use whole wheat noodles.)  Mix 2 cups of milk and 2 cups of heavy cream with 1 cup of fontina cheese (freshly grated) and 1 cup of parmesan cheese (freshly grated).  Add salt and pepper and about 2 teaspoons of flour.  When the pasta is cooked, drain and add it to the milk/cheese mixture.  Place into a glass dish and sprinkle with another cup of each cheese.  I also love freshly grated nutmeg in this, but didn't include it this time around.  Into the oven for 15 minutes and there you go.  Fast mac and cheese. 

I do need to find that other recipe, though.  Although this was great...the other was AMAZING!  :)

Thursday, April 29, 2010

Grilled Maple Honey Mustard Chicken and Vegetable Quinoa


Bring out the barbecue!  Oh how I love to cook on the grill.  (I do admit that I HATE smelling like charcoal afterward, but the taste is so worth it!)  I cut up a whole chicken into pieces after my youngest son asked for chicken legs for dinner.  How can I resist those big brown eyes?

I seasoned the chicken with salt and pepper and grilled the chicken on the grill.  As the smaller pieces cook, you move them to the outside so they don't over cook.  (I'm sure you know the grill scene, so I won't go into grilling detail.)  When I took the meat off the grill, I coated it with Maple Honey Mustard Sauce (except the legs and wings since the kids were having those and don't care for spicy). 

While the chicken was on the grill.  I cooked the quinoa.  I always use chicken broth instead of water for more flavor.  Once it was cooked I added olive oil and sauted veggies.  (I had leftover from the other night). 


Here is how that turned out.  I also threw some asparagus on the grill when I took  the chicken off of it.  Olive oil, salt and pepper are all the seasoning it needs!


This was dinner.  DELICIOUS!

Wednesday, April 28, 2010

Grilled Flank Steak and Oven Fries


I have been making this for years!  It is one of the easiest meats to cook.  The key is to marinate.  I have had an old Betty Crocker cookbook since I graduated from college.  My mom got it for me back then, and it has been the book I turn to when I cannot find exactly what I want in my favorite new cookbooks.

The flank steak only takes about 4 minutes on each side.  You just have to marinate it to make it tender.  The easiest marinade I have found is in the Betty Crocker's New Cookbook (1996).  I will post the recipe at the end of this post.

When the kids were young and they wanted fries I refused to go the fast food route.  I started making oven fries and I never went back.  They are an awesome accompanyment to a lot of meats.  You simply set the oven to 425, cut potatoes into wedges (I use 4 or 5 depending on the size), drizzle with olive oil, salt & pepper, and then dry seasoning of your choice (I used a rosemary seasoning this time, but I love Herbs de Provence). 


Here are the potatoes before I put them into the oven.


And here they are after they come out with the flank steak!  Mmmmm.


You know me, I alway have to serve something green on the table!  :)

The fries bake about 15 minutes on each side.  I usually do closer to 20 because the boys in my house like them cruchy.  You will have to flip them once during cooking time.  You will see how they are cooking and used your judgement to see when to take them out.  It's simple...really.


Give it a whirl!

Herb-Marinated Flank Steak
Betty Crocker's New Cookbook (1996)

1 1/2 - 2 lbs flank steak
2 tablespoons lemon juice (I was out of lemons and substituted OJ)
1 1/2 teaspoons chopped fresh or 1/2 teaspoon dried oregano (I used a dry)
1/2 teaspoon of salt
1/2 teaspoon celery seed (oops, I forgot this)
1/2 teaspoon pepper
1 clove garlic, finely chopped

Make cuts about 1/2 inch apart in 1/4 inch deep in a diamond pattern in both sides of beef.

Mix remaining ingredients; rub into beef.  Place in a plastic bag or shallow glass baking dish.  Fasten bag securely or cover dish with plastic wrap.  Refrigerate at least 5 hours but no longer than 24.

Set oven control to Broil.  (I cooked it in my grill pan.  I've also cooked it on the outdoor grill too.) 

Place beef on rack in broiler pan.  Line with foil for easy clean up.  Broil beef with top 2-3 inches from heat about 5 minutes or until brow.  Turn; broil 5 minutes longer for medium-rare to medium.

Tuesday, April 27, 2010

Chocolate Pistachio Biscotti


My family LOVES biscotti.  It just seems to disappear.  I tried this version from one of my cookbooks and they tasted AMAZING.  My son took one to school today and said all the kids tried to take it from him. 


This recipe came from Martha Stewart's Cookies book.  I love this book.  It has lots of recipes and a picture of each cookie so that you can actually see what you are making!  It didn't take long at all to make.  I think once you make biscotti once, you don't mind doing it again once you see how delicious homemade turns out.  I will never buy store bought again.  I haven't in ages.  Here is the recipe:

Chocolate Pistachio Biscotti
Martha Stewart

2 cups all-purpose flour, plus more for baking sheet
1/2 cup unsweetened cocoa powder
1 teaspoon baking soda
1/4 teaspoon salt
6 tablespoons unsalted butter, room temperature
1 cup sugar
2 large eggs
1 cup shelled pistachios (4 1/2 oz)
1/2 cup semi-sweet chocolate chips

Preheat oven to 350.  Line a baking sheet with parchment paper.

Whisk together flour, cocoa powder, baking soda, and salt into a bowl.  In bowl of an electric mixer fitted with paddle attachment, beat butter and sugar on medium until light and fluffy.  Add eggs; beat on low speed until well combined, scraping down sides of bowl if necessary.  Add flour mixture; beat to form stiff dough.  Beat in pistachios and chocolate chips until just combined.

Transfer dough to prepared baking sheet; form into a slightly flattened log, about 14 by 4 inches.  Bake until slightly firm, about 25 minutes.  Cool about 5 minutes.  Reduce oven to 300 degrees.

On a cutting board, using a sharp, serrated knife, cut biscotti diagonally into 1-inch-thick slices.  Arrange cut sides down on baking sheet; bake until crisp but still slightly soft in the center, about 8 minutes.  Transfer to a wire rack to cool completely.  Cookies can be stored in an airtight container at room temperature up to one week.

Peanut Butter Cookies


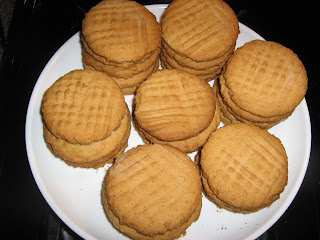
These peanut butter cookies are so yummy.  They are crumbly and delicious.  My favorite way to eat these are to put strawberry jam on top.  Next time I plan to make them super thin and put jelly in the middle and make a sandwich.  These came about because I was out of chocolate chips...I love chocolate chip cookies.  I know people think they are plain or overdone, but a good chocolate chip cookie is as good as it gets. 


Okay, back to the peanut butter cookie.  I got the recipe from Martha Stewart's Cookies cookbook.  Here is the recipe:

Peanut Butter Cookies
Martha Stewart

1 1/4 cups all purpose flour, plus more for flattening cookies
3/4 teaspoon baking soda
1 cup (2 sticks) unsalted butter, room temperature
1/2 cup granulated sugar
1/2 cup packed light brown sugar
1 large egg
1/2 teaspoon pure vanilla extract
1 cup smooth peanut butter (I used a natural peanut butter)
1/2 cup salted peanuts (I omitted these...the kids don't like peanuts)

Preheat oven to 350.  Sift flour and baking soda into a bowl. 

Put butter and both sugars in the bowl of an electric mixer fitted with the paddle attachment; mix on medium speed until pale and fluffy, about 3 minutes.  Add egg; mix until well combined.  Mix in vanilla and then peanut butter.  Reduce speed to low.  Add flour mixture; mix until just combined.  Stir in peanuts.

drop batter by heaping tablespoons onto baking sheets lined with parchment paper, spacing 1 1/2 inches apart.  Dip the bottom of a glass in flour, tapping off excess, and use it to flatten balls slightly.  Firmly press fork tines into each dough ball to make a cross-hatch pattern.

Bake cookies, rotating sheets halfway through, until centers are firm and edges are lightly browned, about 25 minutes.  Transfer cookies on parchment to a wire rack to cool completely.  Cookies can be stored in airtight containers at room temperature up to 3 days.

Monday, April 26, 2010

Calzones


These calzones were amazing!  I usually make homemade pizzas, but don't think I've ever made a calzone before these.  I have no idea what took me so long!  I think we liked this better than pizza!  I have a great recipe for homemade pizza dough....but today I didn't use it.  I decided to go the lazy route and use a premade dough.  I cut it into eight balls of dough and began the calzones!


I prepped my vegetables by chopping the onion, red pepper, mushrooms, spinach, and cheese.  Then I dusted my work space with flour so that the dough would not stick, and started with the first ball of dough.  I rolled it out into a 6-8 inch round, spread tomato paste on the dough and sprinkled on oregano, salt and pepper on top. 


I added the onions, red pepper, mushrooms, spinach, provolone cheese and a slice of proscuitto on top.  Then I folded the calzone in half and crimped it closed with my fingers.  And onto a baking stone that had been sprinkled with cornmeal.


They baked in an oven preheated to 350 for about 10-15 minutes.  My youngest son didn't want all the veggies, so I let him make his own.  He spread the tomato paste, added seasonings, provolone and two generous scoops of ricotta cheese.  Next time I will add the ricotta to all of ours with the veggies in it. 


The came out perfectly golden brown.


Here is a look at the inside of mine.

As you can see, very simple.  Use whatever you like on your pizza or what you have on hand in your home.  You can always search online for ideas of what to stuff them with if you need to.  I am alway looking up new ways to cook my favorite things.  Everyone loves pizza, so this is a win, win! 

Sunday, April 25, 2010

Chicken Parmesan and Whole Wheat Couscous with Sauted Veggies


Chicken Parmesan does NOT have to be served with marinara and pasta!  In fact, in our house we never have it that way!  And it really isn't that complicated.  If you use chicken cutlets, that is the easiest, but if you don't have them on hand, you can take any frozen/fresh chicken breast that you have in the kitchen.  I used frozen chicken breast that I had defrosted.  Here is what I did:

Pound the chicken breasts flat.  I do this in a gallon size ziplock bag so that it doesn't make a huge mess. 

Make three plates/bowls/trays of flour, egg and breadcrumbs.  I sprinkle the flour with salt and pepper, place a chicken breast in it, season the breast with salt and pepper, and then turn it to coat the other side with flour.

Dip into egg.  This can be a couple of eggs scrambled or egg whites.  I always have egg whites on hand, so I just pour out some of that into a coating tray. Make sure egg coating is on both sides of the chicken.

Next dip into bread crumb tray.  I use italian style. 

Once you have coated all of the chicken breasts, heat up a large skillet with 2 tablespoons of butter and 2 tablespoons of olive oil.  Once butter is melted, place chicken into the pan and brown on both sides.  I usually set the oven to 200 degrees and put the cooked chicken onto a sheet pan in the oven to stay warm while I continue to cook the next batch.  Once they are in the oven, you can put freshly grated parmesan cheese on top.

For the couscous, you simple boil 1 1/2 cup liquid and then turn off the burner.  I use chicken broth instead of water to give it more flavor.  Add 1 cup of couscous and cover.  Easy!  I doubled this.  I also sauted veggies I had on hand:  onion, red pepper, and mushrooms.  You can add whatever you like! 

Once the veggies are cooked, remove from heat.  Fluff couscous with a fork.  Serve your couscous with sauted veggies on top!  Really easy and really delicious!


Friday, April 23, 2010

Pork Tenderloin with Polenta, Broccoli and Sugar Snap Peas


Would you believe me if I told you that I made a delicious, mouth watering, juicy pork tenderloin in only TEN MINUTES?  Are you interested?  As you know, I am all about having a healthy, sit-down meal with the family every night.  I have many friends that are busy running kids from point A to point B who barely have time to let the oven preheat.  Would coming home and making dinner in 10 minutes keep you from going through the drive through?  I'm hoping seeing a few recipes like this one on my blog will help you do just that!

Here is what I did.  My kids LOVE polenta.  When I make it I use half skim milk and half chicken broth (1-1/2 cups of each) with 1 cup of polenta.  Bring to a boil and then simmer.  Whisk the polenta to make sure that it doesn't clump or stick to the bottom of the pan.  When it is cooked you can add salt, pepper and freshly grated cheese (I use parmesan). 

Okay, so while the polenta is heating up, I cut the fat off of the pork tenderloin with kitchen shears.  They come in a sealed package with two loins inside (I get mine at costco).  Rinse the meat and pat dry with paper towels.  Add seasoning of your choice (I use barbecue rub...and I'll tell you why shortly).  Place the seasoned pork into the deep covered baker and cook it in the microwave (yes, I said microwave) for 10 minutes.  THAT'S IT! 

You can heat up vegetables in a saute pan or wok while the meat and polenta are cooking.  Once the tenderloin is done...let it set for 5-10 minutes (long enough for you to get drinks and set the table).  Carve one pork loin into medalions and serve with polenta and vegetables.  Save the other tenderloin for another dinner (you can use two forks and pull it a part, add bbq sauce for a delicious bbq pork sandwich another day).  That's two meals in 10 minutes!  Enjoy!


Here is what the deep covered baker looks like if you aren't familiar with one:


Thursday, April 22, 2010

Linguine With Shrimp Scampi


This is a delicious and easy meal that never disappoints!  I always have frozen shrimp in the freezer (not the cooked ones).  To thaw them I dump the shrimp into a stainless bowl of hot water and let them sit there while I get the pasta water boiling and into the pot. 

After getting the shrimp in the bowl, I realized I only had 1/4 of a package of linguine.  So, I decided to call it "crazy pasta night" and added all the little bits of each kind of pasta I had in the pantry bins.  I used linguine, bow tie, and cavatappi.  The kids thought it was hilarious.  This recipe is another Barefoot Contessa recipe.  One of the first I learned to make by memory because we had it often! 


In a separate pan you add olive oil and butter. Saute the garlic and then add the shrimp (don't forget to take the tails off!). Season with salt and pepper. Add lemon juice, lemon zest, lemon slices (I forgot this one!) and parsley. Drain pasta and put into the pan with the shrimp scampi. Combine and add parmasean cheese (I added this). The kids like freshly grated paremsan on everything! A little goes a long way when you grate it fresh!


You can put it in a nice serving dish when you have guests over and it looks fantastic.  Since it was just the kids and I it stayed in the pan on a trivet on the table.


Git it a try!

This used to be my oldest son's FAVORITE meal from 3 years old to probably 7 years old...then he switched to salmon. lol. Everyone always asks me how I get my kids to eat so healthy and not have to cook a separate meal. I'm gonna let you in on it...THERE IS NO OTHER OPTION. What is on the plate is what is for dinner. I actually went to my son's pediatrician when he was 2 years old and asked what I should do, he told me exactly that. I listened, and never made a separate meal again. Will there be whining? Yes. Will there be nights they don't eat dinner? In the beginning, yes. But when they see they are not getting to place their special order, they go with the flow.  They will live. Trust me!

Linguine With Shrimp Scampi
Barefoot Contessa (Family Style Cookbook, p 106)
Serves 6

Ingredients
Vegetable oil  (I used olive oil)
1 tablespoon kosher salt plus 1 1/2 teaspoons
3/4 pound linguine  (I used a few different kinds!)
3 tablespoons unsalted butter
2 1/2 tablespoons good olive oil
1 1/2 tablespoons minced garlic (4 cloves)
1 pound large shrimp (about 16 shrimp), peeled and deveined
1/4 teaspoon freshly ground black pepper
1/3 cup chopped fresh parsley leaves
1/2 lemon, zest grated
1/4 cup freshly squeezed lemon juice (2 lemons)
1/4 lemon, thinly sliced in half-rounds  (totally forgot to do this!  lol)
1/8 teaspoon hot red pepper flakes   (left this out)

Directions

Drizzle some oil in a large pot of boiling salted water, add 1 tablespoon of salt and the linguine, and cook for 7 to 10 minutes, or according to the directions on the package.

Meanwhile, in another large (12-inch), heavy-bottomed pan, melt the butter and olive oil over medium-low heat. Add the garlic. Saute for 1 minute. Be careful, the garlic burns easily! Add the shrimp, 1 1/2 teaspoons of salt, and the pepper and saute until the shrimp have just turned pink, about 5 minutes, stirring often. Remove from the heat, add the parsley, lemon zest, lemon juice, lemon slices, and red pepper flakes. Toss to combine.

When the pasta is done, drain the cooked linguine and then put it back in the pot. Immediately add the shrimp and sauce, toss well, and serve.


Tuesday, April 20, 2010

Jam Thumbprint Cookies


Ina Garten is my FAVORITE person to watch on the food network.  Every recipe that I have tried of hers had been "fabulous."  The barefoot contessa has an amazing collection of cookbooks.  I have all of them and actually USE all of them.  She is an amazing self taught cook.  She is a lover of butter and cream, which those who know me know I try to eat healthy.  It isn't difficult to take the recipes and change them to be a little lighter or substitute ingredients to fit your own style of cooking.  That said, I do NOT change a thing when it comes to her baked goods.  They are worth the indulgence and if you are eating healthy foods most of the time, a cookie here in there isn't gonna kill you!  :) 

I made these for a gathering I had at my house.  Deciding what kind of jam to put in them was my biggest hurdle.  I tried strawberry, cherry and apricot.  I think the strawberry is so commonly used in our home that it wasn't working for me.  The cherry and apricot jams added...DELICIOUS!  I hadn't made these cookies before now because I don't care for coconut, and the recipe has flaked coconut in it.  You really don't get a big coconut flavor, but it adds such sweetness and crunch to the outside of the cookie, that it is definitely a neccessary ingredient. 

The recipe can be found in Barefoot Contessa Family Style Cookboook, which is my favorite of all of her cookbooks!  It is also on the food network website:  http://www.foodnetwork.com/recipes/ina-garten/jam-thumbprint-cookies-recipe/index.html.  Try these!  You will not be disappointed!!!!


One note of caution, if you are like me and love a warm cookie out of the oven BE CAREFUL.  If you do not let the jam set you will burn the roof of your mouth.  I know this because I did this.  Yikes!  Let them cool a bit and then enjoy!!!

Monday, April 19, 2010

Roasted Lemon Thyme Chicken with Sauted Carrots and Beer Bread


My family and I LOVE roasted chicken.  I used to roast a whole chicken with veggies every Friday night.  One Friday night my husband said he was tired of having that.  What?  Tired of my roasted chicken?  So, the next week I cut the whole chicken into parts and roasted it in the oven.  He raved, he loved it, such a nice change...um, it's still the same chicken roasted, just in pieces!  But whatever works!  It takes less time to cook and everyone loves it.  Last night I asked my husband if he would like me to roast a whole chicken like I used to do.  He said he would rather have it in pieces.  So I sliced some lemons and took out the fresh time. 


To cut up a whole chicken you can use a sharp chef's knife or kitchen shears. I used shears. You really just need to know where to cut and then it's easy! It literally took me about 3 minutes to cut up the chicken. I like to use my "cheat sheet" so I make the cuts in the right spots. I have a Martha Stewart book that shows pictures of the best way to cut up a chicken that I use all the time. They use a knife in the pics, which I have done, but if you have a great pear of kitchen shears, that works even faster.  Then just put your pieces on a large sheet pan. 


Pull the skin back from the meat and season with salt and pepper.  This helps the meat become flavorful UNDER the skin. 


Place a small bunch of fresh thyme and a slice or two of lemon, depending on how big the piece of chicken is, underneath the skin.


Cover the skin back over the chicken breast, leg or thigh.  I have cut the skin and done the same with the wings, but didn't do it this time.  I figured the kids could eat those without lemon, and they did.


Drizzle the entire pan of meat with extra virgin olive oil, and season generously with salt and pepper.


Roast in the oven at 350 degrees for 40-50 minutes.  If wings and legs are done before the breast and thighs, just take them out and put them on a plate with foil to stay warm.  Use a digital thermometer to check to make sure the chicken is heated through.  Remember if it is close to the temperature you want, that is good.  It will continue to cook a bit while it sets and the heat redistributes the juices. 


When the chicken was almost done I put sliced carrots into a pan with about 1/4-1/2 cup of water and placed the lid on top.  Simmer the carrots for 5-7 minutes.  Add butter or olive oil and salt and pepper and then continue to cook with the lid off until the liquid evaporates.


Chicken with lemon and thyme, sauted carrots and leftover beer bread.  Yum.  Enjoy!

Sunday, April 18, 2010

Irish Car Bomb Cupcakes


Irish Car Bomb Cupcakes...

In my quest for a guiness chocolate cake recipe I found this AMAZING recipe on Annie's Eats food blog.  With my love of guiness and my girlfriends love for the Irish Car Bombs, I knew I would HAVE to make this recipe.  We were not disappointed.  They are delicious!  I'm going to walk you through the steps.


Heat the Guiness, butter and cocoa powder and allow to cool slightly. 


Add chocolate mixture to the egg and sour cream in the bowl of an electric mixer. Add premeasured dry ingredients.


Line muffin pan with paper liners. Divide the batter evenly between liners, about 2/3 to 3/4 full. I used one large scoop and one small scoop for each muffin. (This ensures they come out the same size.)  Bake in a 350 degree oven for 17 minutes.

To make the ganache filling you simply heat heavy cream and then add it to your bittersweet chocolate and let it sit until the chocolate is melted.  Add the butter and baileys and mix until combined.  It will be shiny and delicious!


Use a pairing knife to cut a cone shaped hole out of the muffins where you will insert the ganache filling.


Here is what it will look like.


Fill a pastry bag (or ziplock bag) with the ganache once cooled to pipe into the cupcakes.  I have found that using a measuring cup or glass to hold the bag is the easiest way to fill it.  This also keeps the job from becoming a messy one!


If you are using a plastic bag (like I did) you will need to cut off the tip with kitchen shears.  Notice I clipped the top of the bag even though it has a zip lock?  Trust me, it's better to be safe than sorry.  I have piped many times only to find the zip came unlocked and what a mess!  Another great thing about using a ziplock is you can just toss it when you are done. 


Here is what they look like when they are filled.


To make the buttercream frosting you simply mix butter, confectioners sugar and Bailey's Irish Cream.  It said 4-8 tablespoons...so I leaned toward the 8.  Who wouldn't? 


I served these last night and they were a hit.  DELICIOUS!  If you would like the recipe you can visit http://www.annies-eats.com/.  She has amazing recipes posted on there!  Just look for the Irish Car Bomb Cupcakes and print it out!  ENJOY!